The purpose of this application note is to provide information on how to run arivis Vision4D on an Amazon AWS EC2 Virtual Machine
Running arivis Vision4D on an AWS instance requires the same considerations that arise when
you want to use arivis Vision4D on an on-premises virtual machine:
- fulfil the basic system requirements
- provide a proper 3D capable graphics card with OpenGL 4.3
- access remotely and also use 3D graphics
- install an arivis Vision4D license
Setup a suitable system
Please refer to the general System Requirements first.
Use the Amazon EC2 console to launch a Windows instance. Choose a suitable Amazon
Machine Image (AMI), e.g. a Windows Server 2019 Base (or later). From the Instance type list,
you can select the hardware configuration for your instance.
To be able to use 3D graphics a graphics capable type should be selected. We recommend a G5
instance (or later). Amazon EC2 G5 instances are NVIDIA GPU-based instances that can be used
for a wide range of graphics-intensive and machine learning use cases. Most important: G5
instances offer NVIDIA RTX Enterprise drivers at no additional cost to provide high quality 3D
workstations.
Please note: we don’t recommend the use of Amazon Elastic Graphics. Even if arivis Vision4D
could work with it in theory, it is very slow and unstable.
If you want to store large data in the VM, a correspondingly large disk should be provided, e.g.
an Amazon Elastic Block Store (Amazon EBS) volume.
Launch your instance as usual. Make sure that the security group allows to connect using
Remote Desktop (TCP port 3389). To connect to the running instance, you must retrieve the
initial administrator password and then enter this password when you connect to your
instance using Remote Desktop.
Setup 3D graphics
After the first start, only the Basic Display Adapter is available. This does not allow 3D graphics
with arivis Vision4D. You can open the Device Manager and check the availability of the
corresponding display adapter.
To install and activate the NVIDIA RTX Enterprise drivers please follow this guide:
https://docs.aws.amazon.com/AWSEC2/latest/WindowsGuide/install-nvidia-driver.html
Summarized:
- configure default credentials for the AWS Tools for Windows PowerShell
- retrieve the enterprise / gaming driver using the provides PowerShell script
- install the driver
- register the driver
- download and install a certification file
- reboot your instance
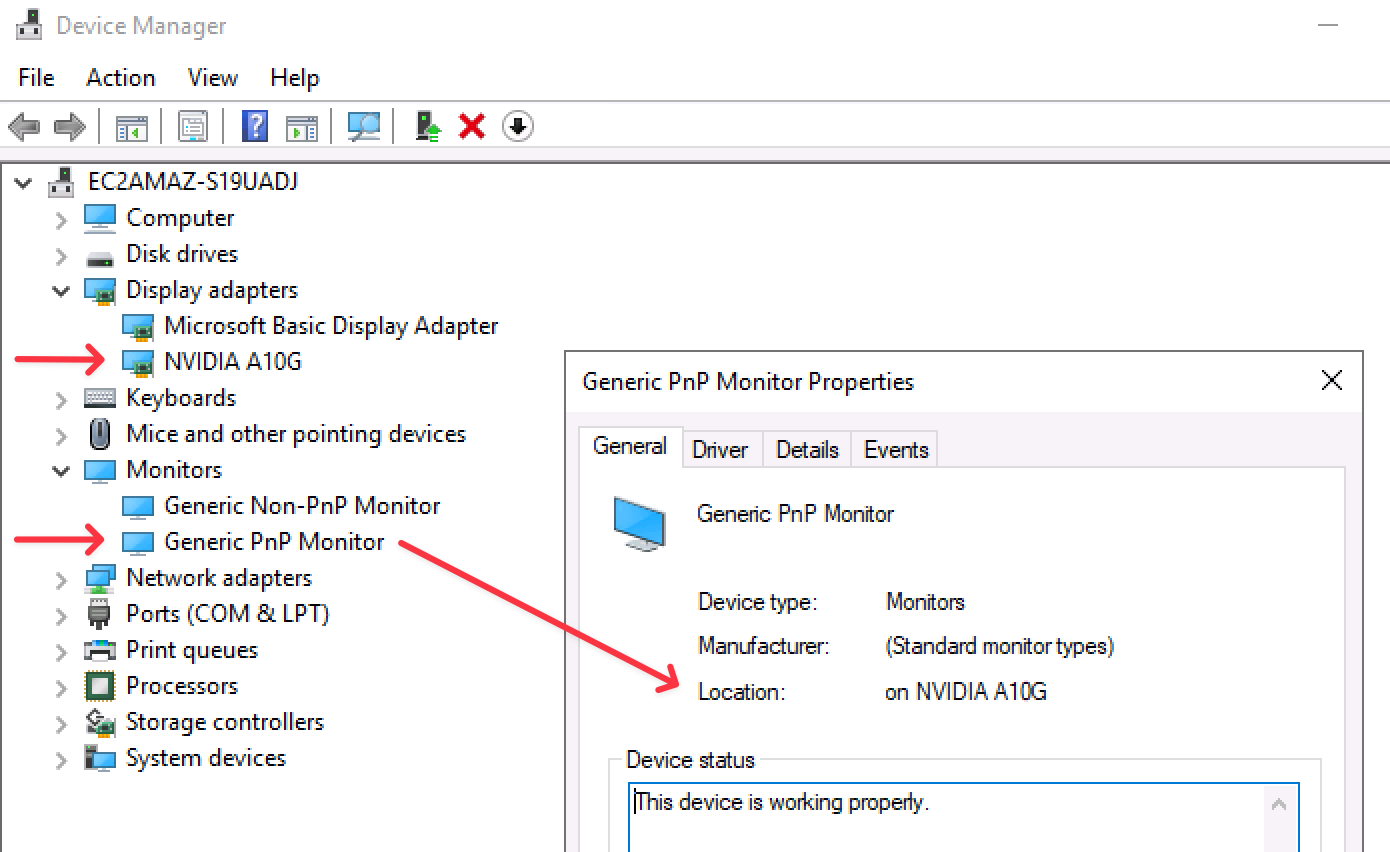
To verify the installation open the Windows Device Manager. You will see a second display
adapter for the NVIDIA card and a second “Generic PnP Monitor” which is located on the
NVIDIA graphics card.

Setup arivis Vision4D
Download and run the latest arivis Vision4D installer from:
https://www.arivis.com/download/arivisVision4D/latest
At the first start the application reports that a license is missing. Use the provided arivis
License Tool to activate with your product key.
Please be aware of some potential problems with using software licenses in combination with
virtual machines. If you want to use V4D on different VMs or change the configuration of the
VM frequently, a dedicated license VM in combination with a floating license might be more
suitable.
To read more about this topic please refer to our Knowledge Base.
Optional: using NICE DCV
To improve the performance of the remote connection to the AWS instance an optional NICE
DCV server/client can be installed.
NICE DCV is a remote visualization technology that you can use to connect securely to graphic-intensive 3D applications hosted on remote servers. With NICE DCV, you can bring high-performance processing capabilities to remote users through secure client sessions.
There is no additional charge for using the NICE DCV server on an Amazon EC2 instance.
Download and install the NICE DCV server installer from the NICE DCV website. Make sure that
the security group allows to connect using NICE DCV (TCP/UDP port 8443).
Use the client for your operation system from the NICE DCV website to connect to the AWS
instance using NICE DCV
