The Volume Fusion module for Vision4D has been available since 2017. This article explains how it can be used.
TLDR
Use Volume Fusion to merge images together that can't be merged using the Tile Sorter.
Registering the volumes for fusion can be done using landmarks...
- Add landmarks using markers to match specific pixels in both volumes
- 3 landmarks are needed at a minimum, adding more is usually not necessary
- Adding the landmarks in the same order makes fusing the volumes much easier
... Or by using surface transformation.
- Extract an isosurface from the moving volume to use as a reference
- Copy the surface over to the base volume and use the surface transformation tool to work out the translation, rotation, and scaling required (most easily done in VR)
- Copy the transformation parameters into the Volume Fusion tool
Fused volumes can either merge equivalent channels or combine the volumes as different channels.
Volume fusion maintains the resolution of the Base volume and matches that of the Moving volume. Care must be taken when merging volumes of vastly different resolutions.
Introduction
Volume Fusion was added to Vision4D as a tool to merge multiple image volumes that could not be merged otherwise. There are several reasons why two image volumes could not be merged:
- They may not have the same orientation - Stitching using the Tile Sorter only works if the volumes have the same Z-axis direction
- They may not have the same dimensions or resolution - this is also a pre-requisite for the Tile Sorter
Volume Fusion has been designed to work around these limitations.
This enables a few specific applications which would otherwise not be practically possible, including for example:
- Merging images of a sample that cannot be imaged in a single acquisition because it extends beyond the range of the field of view or stage movement. In this case, we might capture as much of the sample as possible, maybe including tiling, repositioning the sample, and imaging another part of it.
- Merging images of two parts of the same volume. This is an extension of the task above. If the sample is too large to fit in the imaging chamber, it may be possible to separate the sample into its constituent parts, image each of these individually, then merge them using Volume Fusion.
- Merging images taken in different modalities. Multiple modalities are available for imaging samples, from light microscopy, whether widefield or fluorescence, to electron microscopy and topical spectral imaging (e.g. IR microscopes). Such acquisitions have different outputs and sample preparation steps and will often result in images of different sizes, calibrations, and channel colors.
In all of these cases, and more, Volume Fusion can be used to generate a single volume from two separate volumes, and that fused volume can be used for analysis and visualisation like any other dataset.
Prerequisites
Volumes to be fused need to start as different image sets in the same SIS file
The input of Volume Fusion is two image sets in the same SIS file. This means that the volumes to be fused must first be imported as multiple Image Sets. Once the first volume has been imported, adding the second as a new image set can be done by going to File> Import, selecting the second file, and using the "Import as: New image set" option.
The volumes must be of the same bit depth
While volume fusion can work with images of different dimensions, the images must be of the same bit depth. Bearing in mind that higher bit depths lead to larger file sizes, it may be preferable to scale down higher bit depth images to match a lower bit depth volume than the other way around. Bit depth scaling is done through the Transformation Gallery (Data> Transformation Gallery).
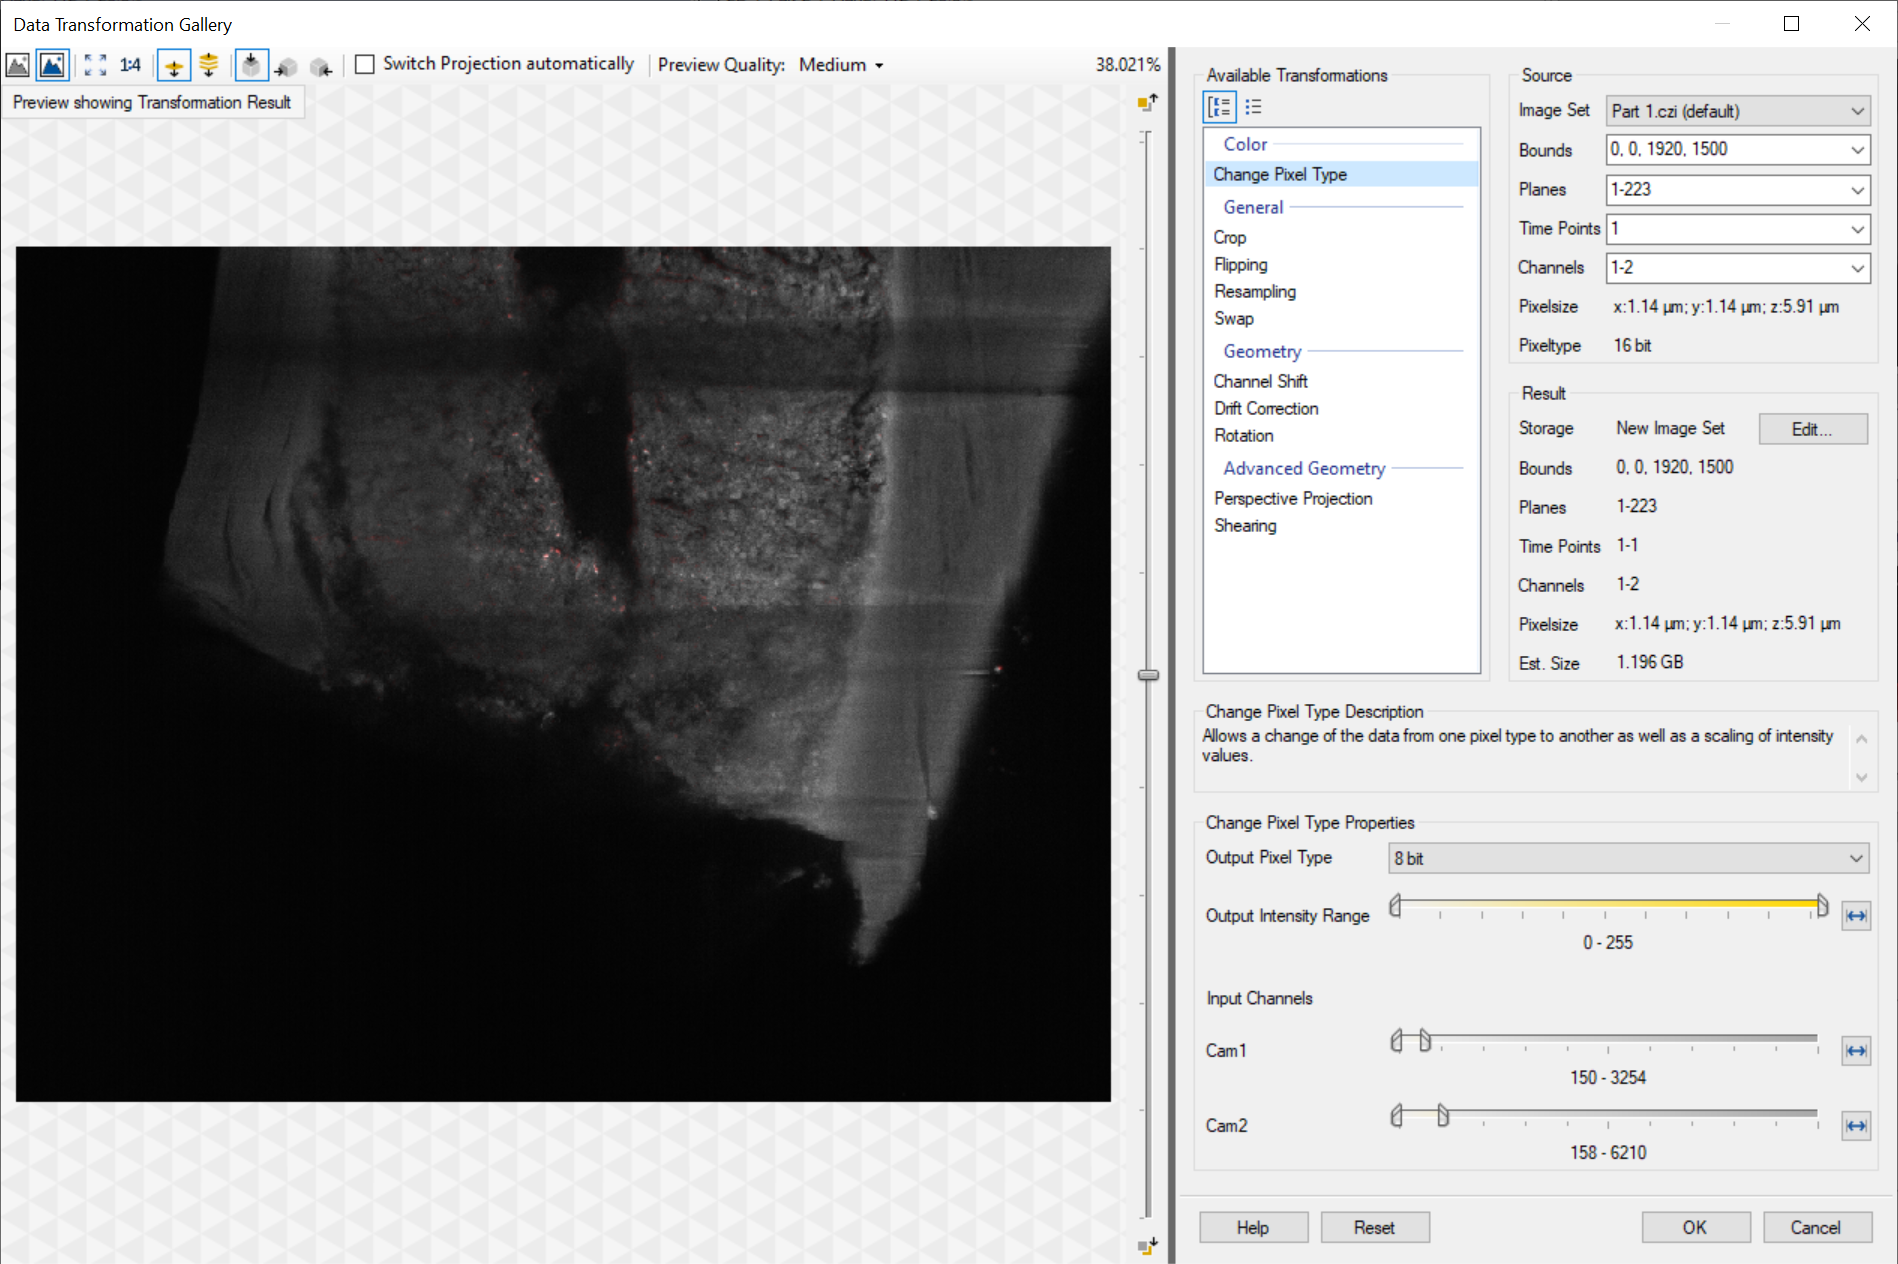
If both images have the same bit depth no scaling is necessary.
Calibrations need to be correct for the sample
Registering using landmarks considers the image spatial calibrations to work out the scaling required (registering using surface transformations ignores calibrations in favor of the user-defined scaling). This is usually not an issue when fusing images captured using the same microscope and the same magnification. However, if the two volumes are imaged using different imaging devices the calibrations could be different and this could lead to the fused volumes having a scaling offset. Also, when doing multimodal imaging where the sample may receive additional preparation steps for the second acquisition, the sample can shrink or grow resulting in a calibration that is technically correct, but effectively wrong. In such cases, we can either correct the calibrations to account for changes in the sample or use the surface transformation to disregard the calibration and adjust the scaling as required.
Fusing Volumes
Volume Fusion is essentially a two-step process. First, we need to establish registration parameters and then we can modify the moving image set according to those parameters so that it can be fused with the base image set. The registration is used to work out translation, rotation, and scaling and can be done in either one of two ways.
Landmark registration - Creating landmarks
If the images are similar enough, and with enough overlap, it can be relatively easy to identify identical features in both volumes. These features could be an individual cell, a vascular or neuronal junction, or even contamination in the sample. What the features are doesn't matter as long as they are identifiable in both image sets.
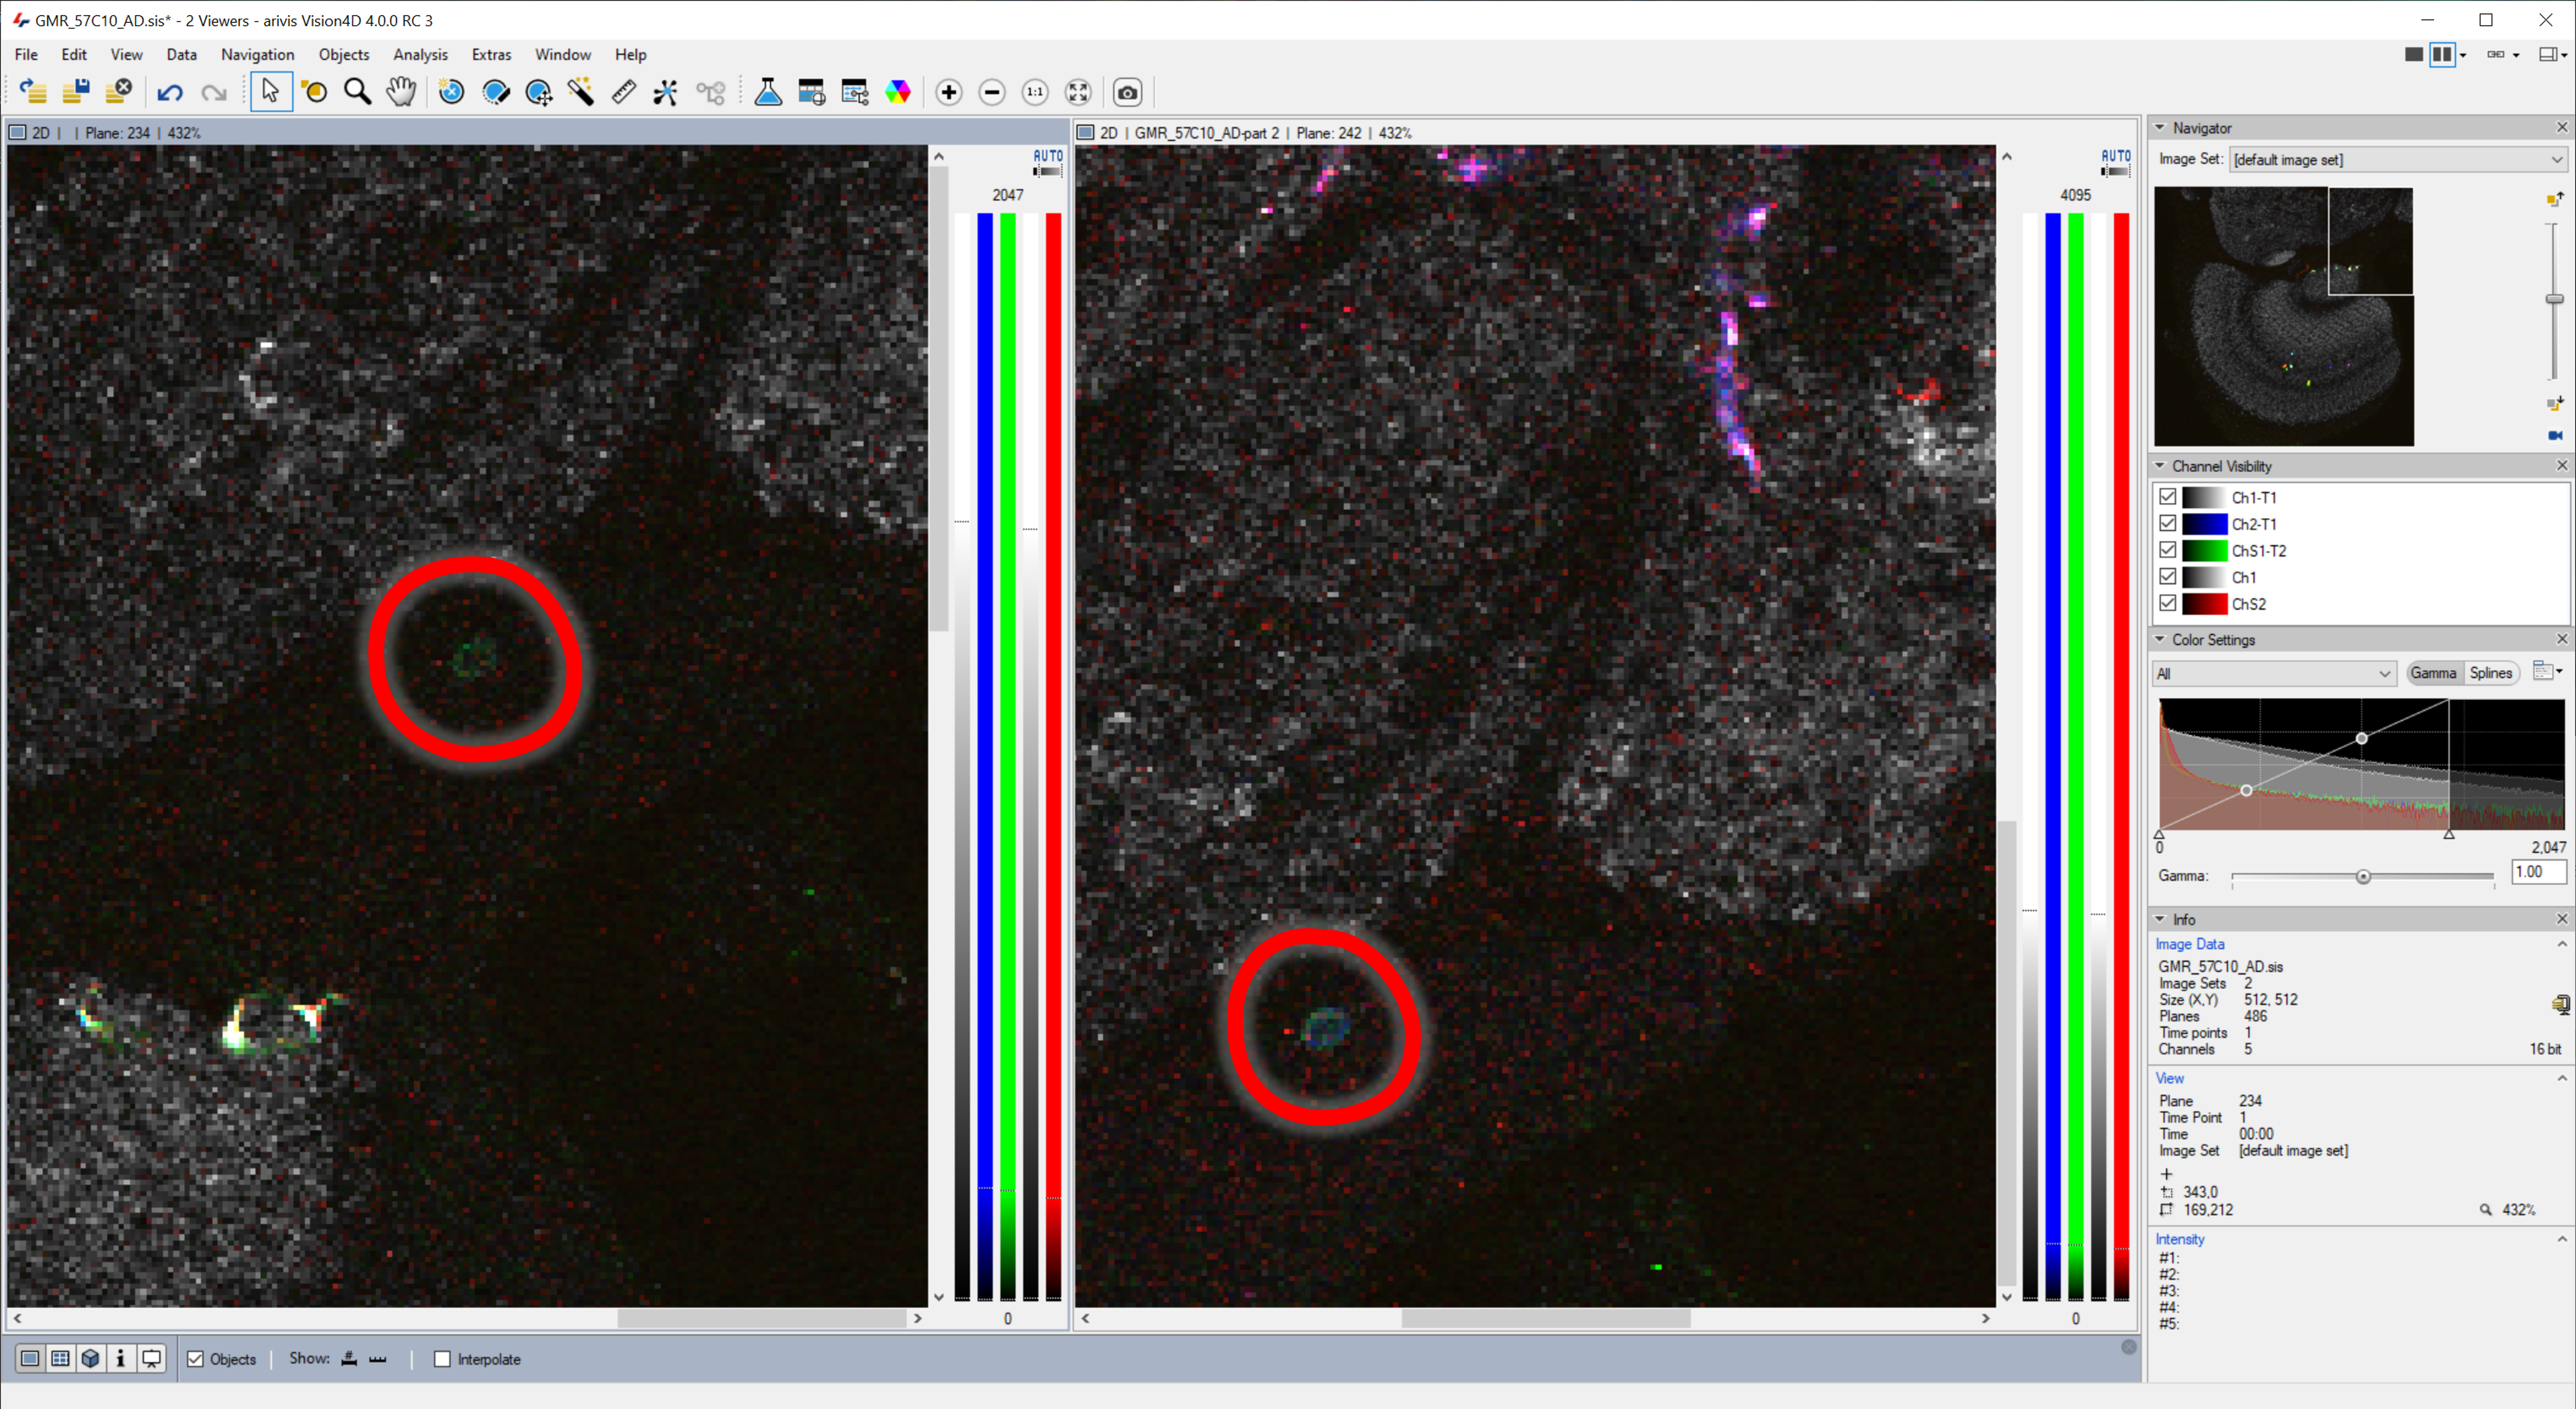
In this screenshot above we can see the same blue/green blob in the 2D view in both image sets.
Once we've identified a feature of interest in both sets we can add a Marker that the Volume Fusion can use as a landmark to register the images.
Then, we need to mark at least 2 more positions as above.
Note that for the best accuracy, it is usually best to mark locations from a different plane, and to space the landmarks as much as possible. Three landmarks are the minimum required for volume fusion. Adding more landmarks can reduce the error, but is usually not necessary. Adding the landmarks in the same order in both images will facilitate the next steps.

In the screenshot above we have changed the colors of the markers so that they match in both sets, and reduced the opacity of the volume to facilitate seeing the markers.
Once we have all the markers we need for the registration we can proceed with the volume fusion.
Landmark Registration - Fusing the volumes
The Volume Fusion window is opened from the Data menu.
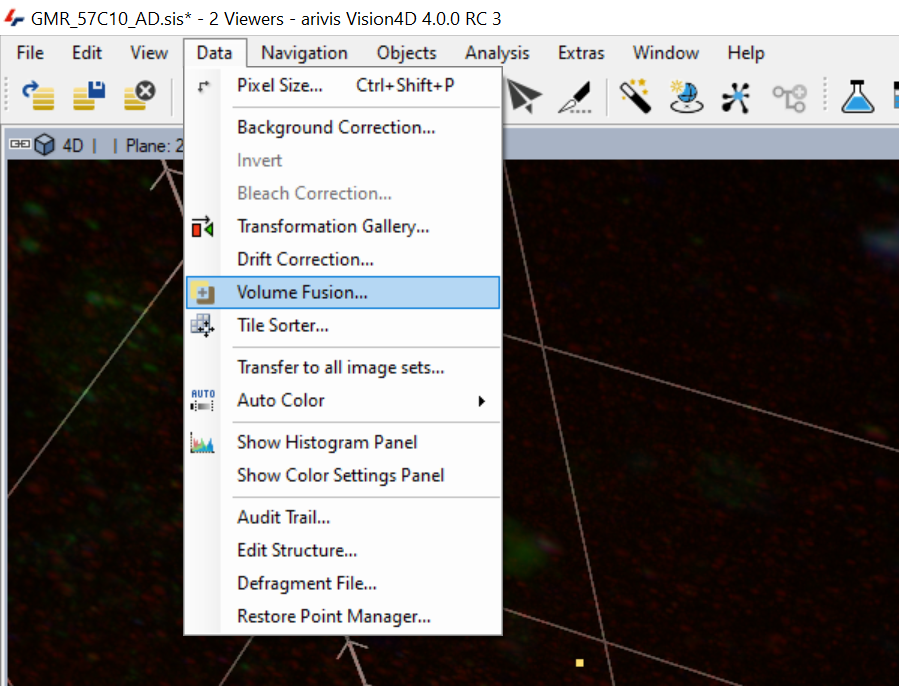
In the Volume Fusion window, there are two tabs. One is used to define the inputs and outputs, the second is used to define the transformation parameters.
First, we need to set the input and output parameters.
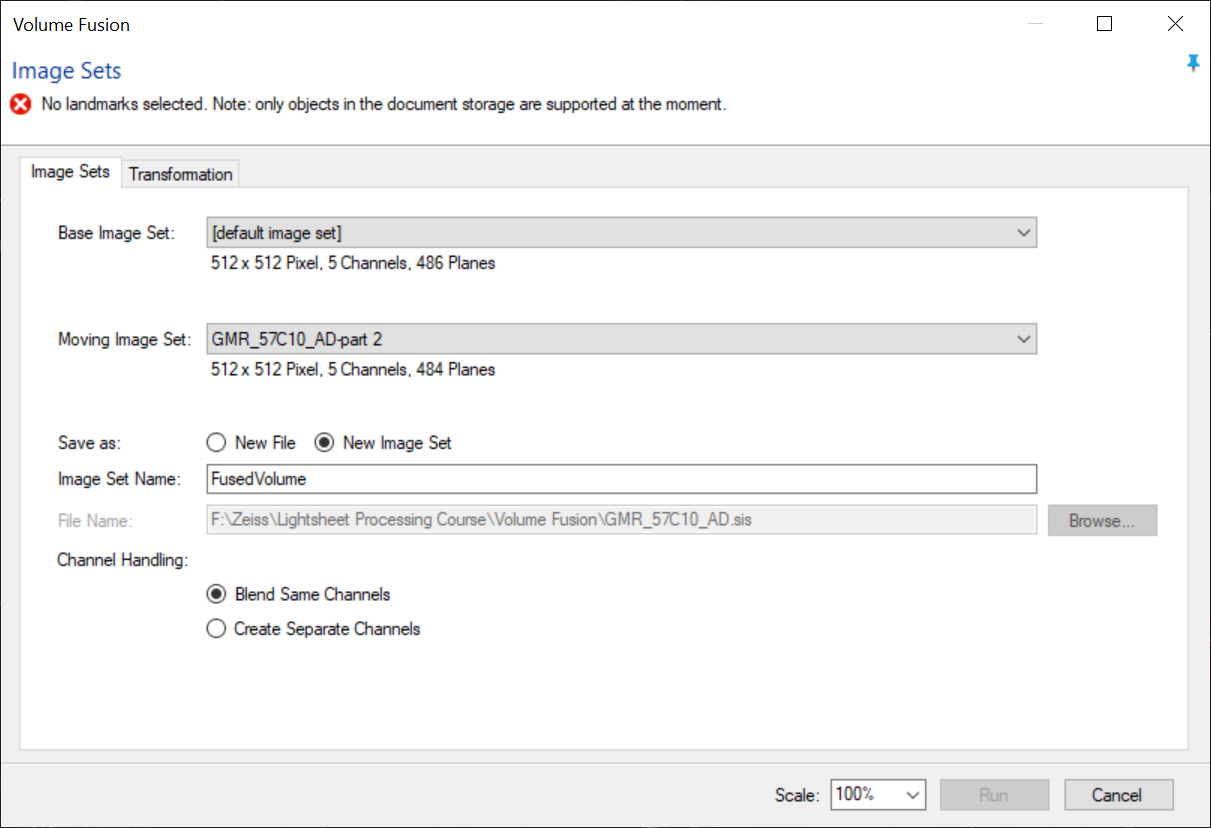
In our example, both the base and moving image sets are of similar dimensions. Which is taken as the Base and Moving set is therefore relatively unimportant.
The output can be either a new file or a new image set.
In a case where we are only fusing two volumes, it usually makes more sense to output the results to a new file. When the fusion is complete we can then discard the original un-fused SIS file.
In cases where we need to merge more than two volumes, it is best to output the fused volume to a new image set. We can then use that fused image set as input for fusions with the next volume and so on.
See below for more on whether to blend channels or create separate channels for the merged volumes.
Once we have set the input and output parameters, we can set the transformation parameters.
Note that the landmarks are added in the order they were created. The order of the landmarks must match between the sets so that the landmark in each column defines the same feature as its equivalent in the other column.
Surface registration - extracting and transferring the surface
Using surface transformation to register two volumes can be preferable, and a lot easier, than using landmarks for a couple of reasons. First, creating landmarks requires that the fused volumes have a share volume with structures that can be easily identified in both. Having a shared volume is impossible in some cases, and identifying the same feature in both volumes can be challenging if the orientation of the images is very different or if there are no easily identifiable features in the shared region for both volumes. In the case of the orientation being an issue, it may be easier to rotate the moving volume to an approximately correct orientation using the Transformation Gallery first, but it may also be just as easy to skip that step and just use surface transformation. Also, as mentioned above, surface transformation can correct for calibration and scaling issues, which landmark registration does not.
The first step in using surface transformation is to generate a surface that we can use from what will be the moving volume. Extracting and transforming a surface can only be done from the 4D viewer. The simplest way to extract a surface from transformation is to switch to the 4D viewer, then go to the Objects menu and select Extract Isosurface. Then we can set a simple threshold to generate a surface. Note that the threshold doesn't need to be the most accurate, we just need to be able to see some structure that we can use to match with the base volume.
With a surface generated on the moving volume, we need to transfer the surface over to the base image set so that we can transform it for the registration.
Once the surface is copied onto the base image set we can start the transformation. The transformation can be done in 2 ways:
- Using the surface transformation tools in Vision4D - these tools are built into the software, but because they work using a 2D interface (screen and mouse), are somewhat limited.
- Using the registration tools in VisionVR - VisionVR is a separate piece of software, which requires a separate license, but the registration tools take full advantage of VR to allow for a sense of perspective and depth perception, and 3D interactive tools to position and scale the surface.
Surface registration - Transforming the surface in Vision4D
The surface transformation tool can be found in the Objects Menu. In the surface transformation window we have sliders to adjust the translation in all 3 axes, and we can also adjust the scaling and rotation. Some practice is worthwhile. rotating the volume using the usual methods remains possible while transforming the surface and is quite useful to ensure the correct location and orientation of the surface relative to the volume.
Once the transformation of the surface matches the base volume we can copy the parameters over to the Volume Fusion.
Surface registration - Transforming the surface in VisionVR
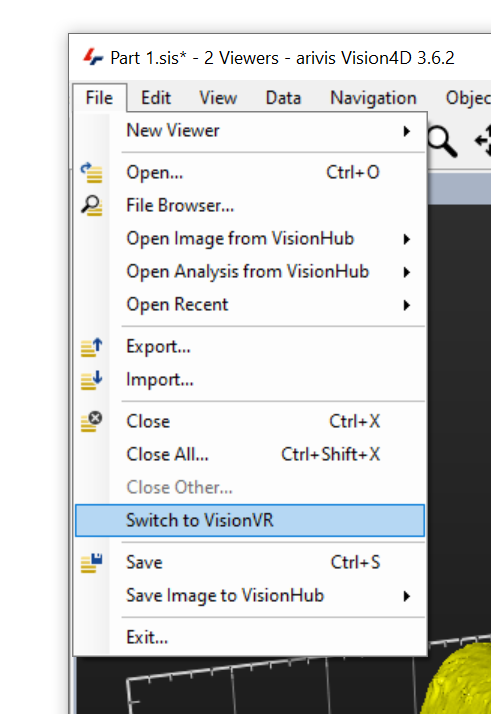
As mentioned above, transformation of the surface using VisionVR can be significantly easier. If VisionVR is installed on the same machine as Vision4D we can simply switch to it from the File menu. Note that when prompted you should save the changes as we close the file in Vision4D and open it in VisionVR.
In VisionVR we can then use the Register tool to adjust the surface as needed.
And once we have transformed the surface we can close VisionVR, making sure to save the changes.
Surface registration - Applying the surface transformation for fusion
With the transformation of the surface in either Vision4D or VisionVR, we can copy the transformation parameters to the Volume Fusion. At the bottom-left of the Surface Transformation window, there are a few buttons.
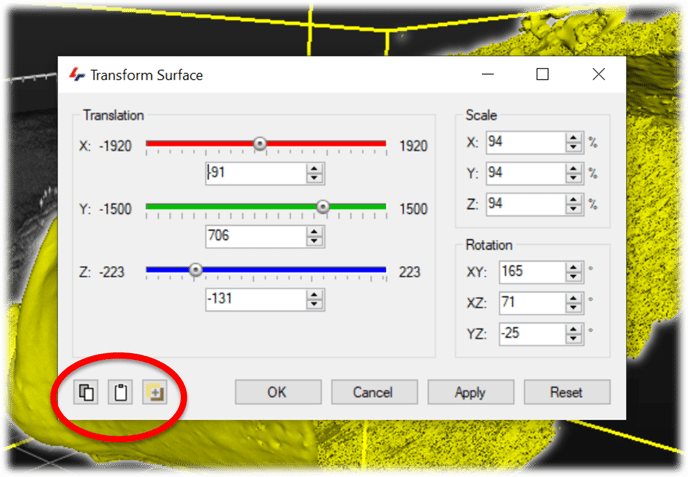
The first two allow us to copy and paste the transformation parameters to/from the clipboard. We could use the Copy button to store the parameters and paste them into the Volume Fusion window, but it is just as easy to click the 3rd button, which opens the Volume Fusion window and copies the parameters in one click.

Using the option to Open transformation in Volume Fusion automatically configures the input base and moving image sets, and applies the transformation parameters from our surface. If necessary we can review and change the Image Sets parameters to check that the correct sets have been selected, and for the correct handling of channels, and when ready, click Run.
Additional considerations
Multimodal imaging
As mentioned above, Volume Fusion works by taking one image set that we define as the Base image set and another that we define as the Moving image set, and transforming the Moving set to match the Base. If both the base and moving image set are similar in size and channels, which is the base and which is the moving set is relatively unimportant. However, if combining images of vastly different resolutions, as one might if combining electron microscopy and light microscopy image, it is worth bearing in mind that the moving set will be scaled to match the base set. This will usually result in the moving set being either scaled up to gigantic proportions (if it is much lower resolution) or scaled down significantly (if it is much higher resolution). Because of this, Volume Fusion is only really useful for multimodal imaging if the two imaging modes produce images of similar resolution.
Merging more than two sets
Each time we do a volume fusion we create a new image set. The typical destination for this new set is the same SIS file where the original sets currently reside. This means that when we fuse images, the size of the SIS file will grow significantly because it will now include both the original sets and the fused volume, which is usually about at large as the sum of the two original sets. So, if we merge a 1GB set, with another 1GB set, the resulting file will likely be in the region of 4GB (1GB for the base set + 1GB for the moving set + 2GB for the fused volume). Because of this, and the fact that the base and moving sets are generally only useful for the creation of the fused volume, many users will prefer to output the fused volume as a new SIS file and then delete the SIS file containing the original sets when finished.
However, as mentioned above, we can only fuse volumes that are in the same SIS file, so what would be the best way to fuse 3 or more sets together? Let us consider a case where we might merge 4 separate image sets into a single fused volume. We would start off by importing all of them as multiple sets in the same SIS file containing "set-1", "set-2", "set-3", and "set-4". We would then fuse "set-1" and "set-2" into our first fused volume, "fused-set-1". We can then do the fusion between "set-3" and "set-4" to create "fused-set-2". Finally, we would fuse "fused-set-1" and "fuse-set2" into a new "fused-set-all". The final result can be saved in a new SIS file, but all the intermediate steps must be created in the original SIS file.
Additionally, users should consider the point above concerning the size of the SIS file after fusion. If again we assume each set is 1GB, the SIS file will grow to around 8GB before we do the final fusion into a new SIS file that will only be around 4GB. So in total, we would need at least 16GB of spare disc space to store all the images, at least until we have finished and we can delete the original and interstitial images. Of course, the actual size of images users might wish to fuse will vary, but care should be taken to ensure there is enough storage space not just for the original images and the end results, but also for the intermediate steps.