This article describes how to create maximum intensity projections in arivis, and how these can be used for further downstream processing
TL;DR
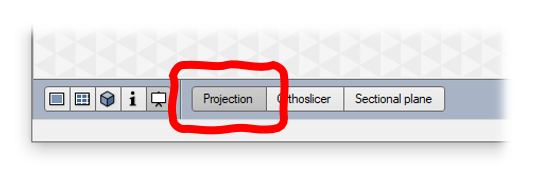
1) Switch to the Projection Viewer
2) Set up your projection scenario
3) Use the Save as... button to save the projection as a new image set or document
Introduction
When using fluorescence microscopy, especially for in vitro cell cultures it is common to acquire multiple planes to capture the full depth of the sample. In many cases the 3D information is useful and arivis can use it to segment 3D objects and measure volumetric properties. However, in some cases the main advantage of acquiring a stack is to be able to get the whole sample in focus at the optical resolution that allows us to measure the features of interest. In such cases compressing the stack into a single plane can provide all the information that is required while working from much simpler, and smaller datasets. Maximum Intensity Projections (MIPs) are an efficient way to compress such images into a single plane.
The first point to note is that many acquisition systems are capable of producing these projection images at the time of capture, or at the time of saving, and that if our imaging device is capable of doing this automatically this may be the most efficient way of producing these images for analysis. This is generally the preferred method because:
- It reduces the amount of data being generated or stored in the first place, especially if we don't intend to treat the images as a 3D stack afterwards
- Generating a MIPs in arivis is not automated, meaning that we have to actively convert each stack into their respective MIPs. This can be especially time consuming for large datasets that contain multiple fields of view.
- The process of generating a MIP in arivis creates a new file or image set within the existing document, leading to some redundancy in storage or the potential need to do a lot of manual tidying up to remove the uncompressed stacks.
- When dealing with large datasets with multiple image sets, if we save the MIPs as new documents it can lead to a large number of documents to be processed, and if we save the MIPs as new image sets it leads to large files with a large number of sets that will need to be actively selected or removed from the selection for batch processing
Having said all this, arivis Pro can produce Maximum Intensity Projections from the Projection Viewer.
Generating MIPs in arivis Pro
Creating MIPs in arivis Pro is done through the Projection Viewer. We can switch to the Projection Viewer using the Viewer Type Switch at the bottom left of the arivis window.

the Projection viewer can also be used to project orthoslices or sectional planes, but we can use the Projection mode for this task
Then, we can set up the projection parameters.
The Projection viewer can project along any of the X, Y, Z or even Time axes. We can also project the whole or only a selection of the dataset (e.g. a selection of planes). By default the preview is not updated automatically as previewing for a large dataset could take a considerable amount of time. Instead, we need to click on the Update button to generate a preview. Note that for smaller datasets we can use the Auto-update option to get a dynamic preview of changes to the projection scenarios.

Once the parameters are set to meet our requirements we can save a full resolution projection image by clicking the Save As button.
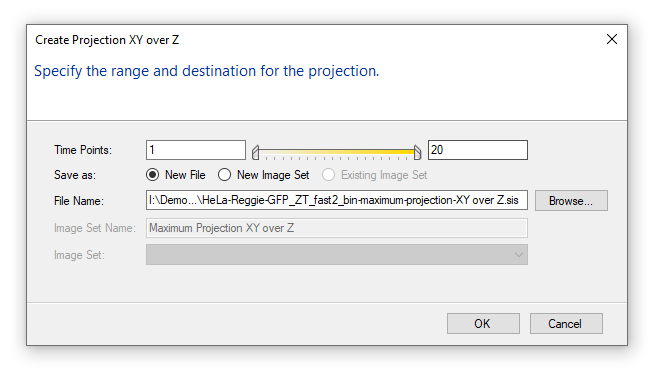
At this point we can choose to save the projection as a new file, or a new image set.
Additional remarks
As mentioned in the introduction, it is best, where possible, to generate the MIPs at the point of image capture.
If we want to use images in a batch analysis it may be preferable to save the MIPs as new documents to facilitate the batch configuration since different pipeline parameters will most likely be required to process MIPs as to process stacks.
For simple snapshots to be added to presentations or publications, using the copying the viewer content to the clipboard, at the resolution currently displayed on the screen, is the fastest way to export the results, and in most cases produces images of an acceptable quality. Creating MIPs as described here is only necessary if we want to have the full native resolution of the dataset and if we want to be able to use it in image analysis pipelines.
For publication it is also worth considering whether a 3D snapshot or video could be a better output.