This article explains the principles and tools used in arivis VisionVR to set up collaboration sessions that can be shared by multiple users.
Principles of collaborative VR
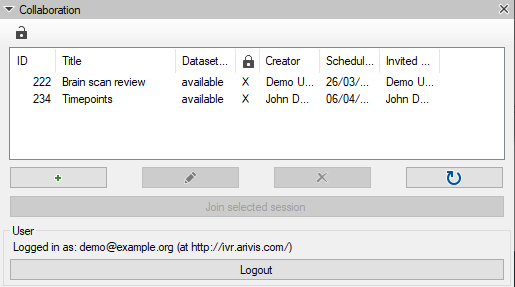
Setting up a session
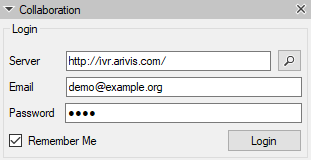
Logging into the VR Collaboration panel
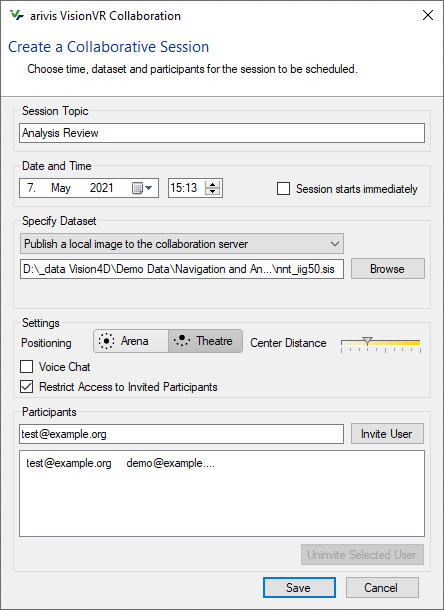
Specifying a dataset
- Publish a local image to the collaboration server
Using this method is the simplest in some ways. Just select the SIS file you wish to use and the file will be automatically zipped and uploaded to the server ready to be downloaded as users log in to the collaboration panel. However, this method limits the total zipped file size to 1GB. This includes the SIS and objects file. To use this option, simply click the Browse button to navigate to the SIS file you want to use. - Publish a local image to a shared folder
This method is similar to the first, except that the zipped file is published in a shared folder, typically on a network drive. The advantage of this method is that we are not limited to a maximum zipped file size of 1GB, however, it means that the shared folder must be accessible to all users of the session. To use this option, first, select the file you SIS file you want to use, then select the shared folder you want it uploaded to. - Link a remote image
With this method, you must have already uploaded the images you want to use as a ZIP file to a file-sharing system that offers direct download link options. For example, if using Dropbox, you can right-click on the ZIP file in the Windows Explorer if Dropbox is installed, or go to your Dropbox account in a web browser and select the option to generate a download link. When a download link is generated this way, the link may terminate in …dl=0. Changing the “0” to a “1” will enable direct downloads. Different file-sharing services work differently. Please check support pages for your preferred system to find out more about generating direct download links.
Note that this method will not work if the download requires a login or password.
Session Settings
Having specified a date, time, and dataset, the next step is selecting the session options. Mainly this is for the position of collaborators as they join the session and the audio settings if any.
The positioning can use either an “arena” style where users join the session in a circle or a “theatre” mode where collaborators join side by side.
In Arena mode, after the first user enters the session the second will join on the opposite side of the volume pedestal from the first. As more users join, they are automatically assigned to gaps halfway between those already present.
In Theatre mode, users join around a semi-circle in front of the volume pedestal.
 |
 |
| Arena | Theatre |
In either case, the Centre Distance sets how far away from the pedestal users will be when they join. Remember that users are always free to move around the virtual space as they in any normal VisionVR session, so this is only the starting point. But conversely, it is generally a good idea to make sure the users are close enough to the pedestal to interact comfortably with the data. A distance of 50cm to 1m is a good starting point for you to try.
Next, we must set the audio options. As with most collaboration scenarios in real life, the ability to communicate verbally is key to the success of the session. Collaborative sessions in VisionVR can be configured to use a Mumble server, or simply use whatever audio/video conferencing system you have available to run in parallel to the VR session. Details on how to configure Mumble are available in the Help files. If you prefer to use a remote conferencing service (e.g. MS Teams, GoToMeeting, Webex), configure your session there first then simply copy and paste the joining link in VR session settings. When users join the session, a message will pop up with the link provided for the user to follow and connect to the conferencing service. Once in the call, the user can return to the VR session with the audio session running in parallel.
Participants
The final step in configuring a collaborative session is the selection of participants.
Anyone can be invited to join a collaborative session as long as they have:
- a computer capable of running the software
- arivis VisionVR install on their computer with an active license (contact support by creating a support ticket at the top of this page to get a download link)
- been set up as a user on the collaboration server (Contact support to have an account created)
- A compatible VR headset
Note that it is possible to join a VR collaborative session if you do not have a VR headset, though the experience will be inherently limited.
Also, while you do not need the collaboration module on your license to join a session, you do need one to create and host a session.
To add a user to the session, simply type their user name in the first box in the Participants section then click the "Invite User" button. If the user account exists the invitation will be sent once the session creation is complete and it will appear automatically when they login to the Collaboration panel. Add more users one-by-one as above. If you then want to remove a user you can do so by selecting them in the invited user field and then clicking the "Uninvite Selected User" button.
Click the "Save" button when all participants have been added and all other details of the session have been confirmed.
Editing a session
If any parameters of a session need to be modified for whatever reason, you can do so at any time before the start of the session. To do so, start by selecting the session you want to edit in the Collaboration panel and then click the Edit button (blue pencil icon).
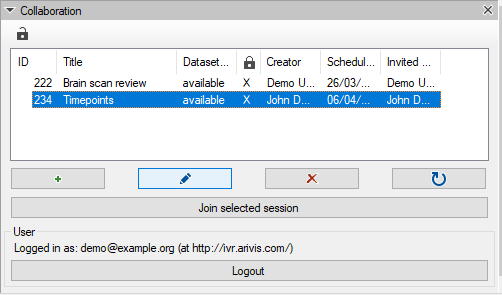
You will then have the possibility of editing any of the session parameters as above.
The session parameters will then updated on each participant's machine the next time they log on to the Collaboration panel on their system.
Note that changing the session dataset parameters will mean that the dataset will need to be downloaded again by the participants when they log in. Avoid making changes at the last minute to ensure there is enough time for participants to download the data prior to joining the session.
Joining a session
To join a session a user simply needs to log in to the collaboration panel and double click on the session they want to join.
Some points of note:
- The dataset status will update with a progress bar while the dataset is being downloaded or simply say "available" when it is ready. You cannot join a session unless the dataset is listed as available. Make sure to log in to the session with plenty of time to download the dataset. Logging in to the collaboration panel the day before a session to download any available datasets is a good idea.
- While having a VR headset is not necessary to join a session, not having one will limit the type of interactions you can have with the data. If you join without a headset you will not be able to:
- Use clipping planes, pointers or other VR tools
- Make use of the advantages of VR visualisation including stereoscopic depth rendering
Also, the fast, dynamic, and responsive interactions that feel natural in VR can be somewhat disorientating if looked at through a standard computer display.
Once in the session, the navigation will be fairly intuitive if you are already experienced with navigation and interactions in arivis VisionVR. VR tools can be accessed by clicking on the left-hand joystick. Tool selection is then done using the right-hand controller and trigger. If you are not the presenter you can request to present by using the A button and a prompt will appear in the current presenter's display to allow or deny the transfer of presentation rights. As a presenter you can use the normal navigation tools to move, scale or rotate the volume, use the pointer or marker tools to highlight specific features, and use clipping planes to reveal image data below the surface of the volume.
Since virtual avatars are also automatically displayed for all users who join with a headset, it is also possible for anyone to point at specific features in the virtual space and have collaborators see those interactions without the need for the presenter point and marker tools.
A chat option is also available in the Collaboration panel for users who prefer written communication or do not have the possibility of joining the teleconference.
Leaving a session
To leave a session, users simply need to remove their headset and click the "Leave Session" button in the Collaboration panel.