This article explains how to integrate cellpose into an arivis Vision4D pipeline
UPDATE JULY 2023: Starting with Vision4D 4.1.1 this procedure is not necessary anymore - import of pre-trained Cellpose models now works without Python/Anaconda environment
TLDR
To use cellpose in Vision4D we need the following:
- Install anaconda python
- import the cellpose environment in the Anaconda Navigator
- Configure Vision4D to install the arivis libraries into the cellpose environment
- Use the Python Segmenter operation to load the cellpose script and define the required parameters
Introduction
Cellpose is a deep-learning (DL) based algorithm for cell and nucleus segmentation. It was created by the Stringer and Pachitariu groups and was originally published in the Stringer et al., Nature Methods, 2021.
Cellpose uses a cell detection method that predicts object shape using the flow-representation of object cell dynamics that is well-suited to approximate and define the complex borders of the cells in the microscopy images. These representations are provided for the DL model training and predictions (inference). Full documentation of the method can be found on the cellpose website. 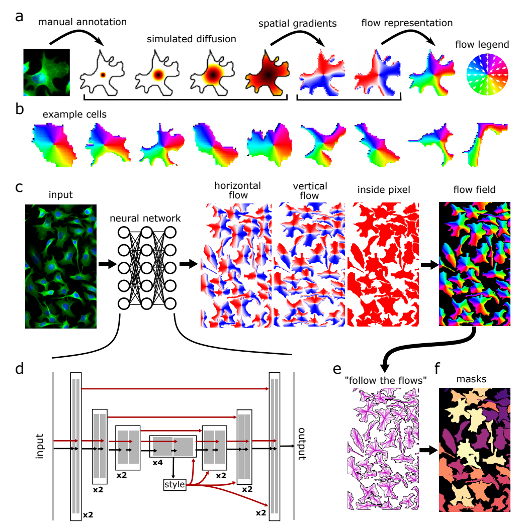
Vision4D can be configured to execute cellpose segmentation within analysis pipelines, thereby enabling users to take advantage of both the advanced segmentation enabled by cellpose and the image and segment processing and visualization tools offered by Vision4D. This article explains how to download and install the necessary tools, and how to configure the pipeline Python Segmenter operation to segment objects using cellpose.
By integrating cellpose into a pipeline, users can take advantage of the full functionality of the Vision4D pipeline concept to:
- Process large multidimensional images
- Enable segmentation in an easy-to-use interface
- Enable the visualization of objects segmented using cellpose in 4D with advanced object display options
- Facilitate complex further analysis like parent-child relationships and tracking
Preliminary Remarks
Vision4D runs deep learning applications for instance segmentation such as Cellpose and StarDist using external and arivis-independent Python libraries and tools produced by third parties.
These tools must be installed by the user under their own responsibility, strictly following the instructions in this document. arivis has tested the setup protocol on several computers, however, due to the different and unpredictable hardware and software configurations of any given computer system, the results may vary on a case-by-case basis. Therefore, arivis declines any responsibility concerning the correct tools, installation, and setup on the individual user’s workstation. arivis cannot be made responsible for any malfunctioning or failure of the deep learning environment setup. arivis does not guarantee technical support on the setup task or on any deep learning application. Furthermore, arivis also declines any responsibility regarding the validity of the scientific results gathered from the deep learning application.
Installing the prerequisites
To use the cellpose script in Vision4D, we need 3 configuration steps:
- Install Anaconda Python
- Import the cellpose environment
- Configure the Vision4D Machine Learning preferences to use the environment.
Installing Anaconda
Instructions for downloading, installing, and configuring anaconda for Vision4D can be found here.
Setting up the cellpose environment
Once anaconda is installed we need to set up the cellpose environment. The cellpose environment can be downloaded here. To install it we need to start by opening the Anaconda Navigator with administrator privileges:
In the Anaconda Navigator, we can select the Environments tab and use the Import button to navigate to the YML file we downloaded earlier.
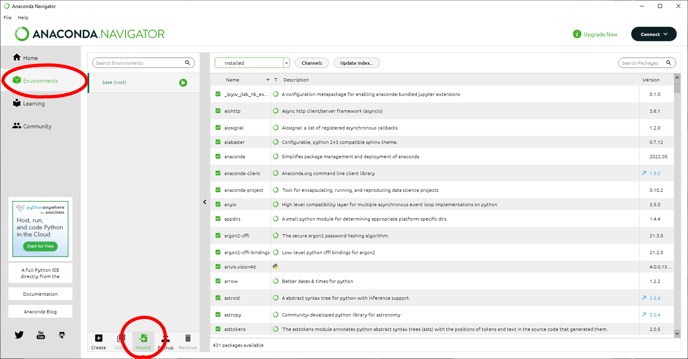
We can rename the environment to make it easier to keep track if using multiple environments and click Import to import it.

The import process can take several minutes.
Once the environment has been created, we need to add the arivis package to this environment. This is done in the Scripting preferences. But first, we need to make a note of where the environment we just imported was created. The easiest way is to hover the mouse cursor over the environment name:

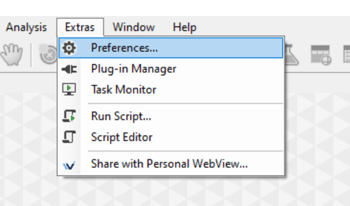
Then, in Vision4D we can open the Preferences window (Extra> Preferences), and select the Scripting tab.
Then we can Install the arivis package in the right location, and it is best to test the installation happened as expected.
Using cellpose in Vision4D
Having set up all the pre-requisites, we can configure pipelines that use it. First, we can add the Python Segmenter to the pipeline, then use the browse button to load the PY script which we can download here:
Setting up cellpose parameters
Once the script has been loaded into the operator we can set up the parameters for the operation.
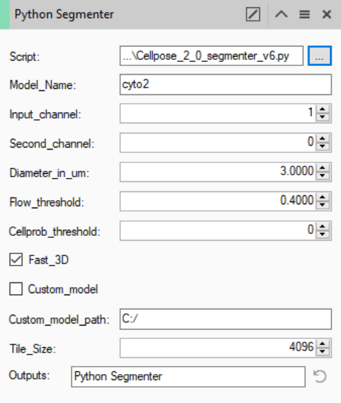
All the parameters here are defined by the cellpose method. More information about each of those settings can be found on the cellpose website.
As mentioned in the introduction, cellpose uses pre-trained models to segment the cells. Some pre-trained models are included (cyto2/nuclei), others can be downloaded from the cellpose website. For most applications, the cyto2 or nuclei models work fine. To select either of these models, we can simply type the name of the model in the Model_Name field (note that the name is case sensitive).
As hinted at by the name of these models, they are each tuned to detect specific portions of cells. Namely, the cyto2 model detects cytoplasm, while the nuclei model is tuned for nuclei. The Channel field should therefore indicate which channel shows this specific component. Note that the cyto2 model can also produce improved results by adding a secondary channel for the nuclei. In this case, the cytoplasm channel should be selected in the Input_channel field, while the nuclear channel should be used in the Second_channel field. If there is no nucleus channel, or the model used is not able to use a second channel the Second_channel field should be set to 0 (zero).
Note that the channel numbering is taken from their ordering in the set. This can be clearly seen in the Channel Visibility panel.
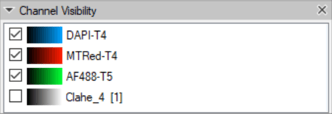
In this case, the DAPI nuclear channel is channel #1.
The Diameter_in_um field is used to define how big we expect the objects to be. This does not have to be an exact specific number, but it should be representative of the typical object diameter. Some experimentation with this value is worthwhile to better understand how much of an effect it has. Generally, the best way to set this is to use the Measure tool ![]() to measure the diameter of a typical cell.
to measure the diameter of a typical cell.
The Flow_threshold and Cellprob_threshold fields are used to fine-tune the predictions for our specific images. Details of how each of these parameters affects the result can be found here, but as with the diameter, some experimentation is worthwhile. Note that the Cellprob_threshold value must be between -6 & +6.
The Fast_3D parameter is binary and can therefore only be on or off. If it is left on the predictions are made plane by plane, without any knowledge of the neighboring planes, and the end result is simply collating those predictions in 3D. As the name implies this is faster but potentially less accurate as an error in the prediction in one plane is more likely to lead to an object being split in the Z axis. In contrast, if this option is left off the model uses information from neighboring planes to improve the prediction in the current plane. In either case, the end result will be a 3D object (if the set has only one plane the object is simply one plane thick).
The operator can be configured to use custom models. If we want to use a custom model we can simply check the box for Custom_model and enter the path for the model file (note path names must use forward slashes e.g. "C:/CustomPath/Model"). The name in the Model_name field will then be ignored. More information on creating and using custom models can be found on the cellpose website.
Finally, we have two Vision4D-specific parameters. The first is the Tile_Size. This implementation of cellpose has been designed to take advantage of Vision4D's capacity to process very large images. However, the cellpose model itself is not built to be RAM independent the way that Vision4D is. Therefore, to process very large images this implementation divides the images into multiple tiles, each tile is processed individually and the results are collated from these predictions. Because these models are RAM-dependent, the tile size should be set according to the available memory. In practice, leaving the tile size at the default value works for most people.
The final parameter is common to all segmentation operations, it is the tag used to label the objects created by this operation. It is how other pipeline operations can call on the objects created by this operation to use or refine the results.
Using cellpose in pipelines
Cellpose is a powerful segmentation tool for bioimage analysis, and it is free to use and does not require commercial software like Vision4D. However, there are advantages to using cellpose within Vision4D pipelines.
The first main advantage of using cellpose in Vision4D was alluded to above. This implementation allows users to use the method with images of virtually any size on virtually any computer that runs MS Windows. It can therefore be used to segment very large 2D and 3D datasets like slide scans and Light-Sheet scans.
The second advantage of using cellpose in Vision4D is the ability to use it in conjunction with other pipeline operations to refine the results, extract additional information, and enable easy-to-use visualization tools to both review and present the results of analyses.
Building complex pipelines that use cellpose, users can:
- Use pre-segmentation enhancements to create more easily segmented images
- Refine the results of the segmentation to remove segmentation artifacts like small/large objects that shouldn't be segmented,
- Use cellpose segmentation results together with traditional segmentation tools to identify inter-object relationships like finding children objects inside cells or distances to neighbors
Many of these possibilities are covered in the User Guide that users can access from the help menu, and in other articles on this website. Please use the search tool to find out more about compartments analysis, object coloring options, movie making, etc.
Download Full "How to : install and run predictions with Cellpose» PDF