This article is intended as a starting point for users who are completely new to the platform, explains certain principles and concepts, and basic functions.
Introduction
arivis solutions are widely reputed for their ability to handle large image data. At the core of this ability is the way that we store, access and process image data. A more thorough explanation of why we do things this way and the basic concepts behind it can be found here, but for now, it suffices to state that Vision4D requires images to be saved in a specific format to work.
The first two points to note on this are:
- Import only needs to be done once.
Importing is the process of copying the image data from whatever format it is saved in, into a new SIS file that Vision4D can open. Once the SIS file is created that file can be used from then on for the rest of the visualization and analysis workflow and the original file can be kept as a backup if needed. - Importing is usually a very straightforward process.
In most cases, especially those concerning popular imaging file formats such as those of the most common microscope suppliers, importing an image requires very little user interaction beyond simply selecting a save location for the output SIS file. However, arivis does offer advanced import options for cases where the image format is not fully supported.
Importing Images
As mentioned above, importing images is necessary, and usually very straightforward. We can simply drag-&-drop a file from the file explorer into an open viewer to start the import process. Then, we simply need to choose a name and save location for the results:
In cases where the file selected is fully supported that is all that is required. Vision4D will automatically read and copy all the image data and metadata. However, it is also possible to import some partially supported files or use more advanced import scenarios when needed. For example, if the images are stored as multiple TIFF files, Vision4D will be able to read the image information but some of the metadata relating to the dimensionality of the image set may be unrecognizable. In such cases simple import scenarios can be used to, for example, import simple Z-stacks:
Or import simple time series:
More complex import scenarios are also possible for multidimensional import or imports with stitching of mosaic images.
Once the images have been imported into a SIS file, the SIS file can be opened in the same way (drag-&-drop into an open viewer), or simply by double clicking the SIS file in the Windows Explorer.
Checking and updating calibrations
When images are imported, Vision4D will automatically read and copy time and distance calibrations where possible. But if this information is missing from the metadata, or you simply want to check that it is correct, it is possible to edit those. Check this article about calibrating datasets to learn more.
Navigating through Image Sets
The SIS file format supports multiple dimensions of virtually unlimited sizes, including XY, Z planes, time points, channels, and sets. The main tool for navigating through these dimensions is the Navigator Panel. It is normally found in the top right of the arivis Vision4D window, but can also be opened by right-clicking anywhere in the panels on the right of the viewer or from Window> Panels.
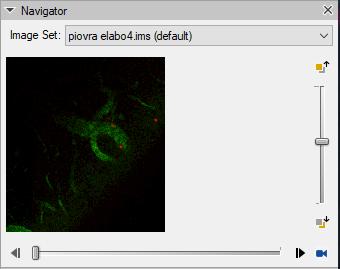 The Navigator is context-sensitive and will only display the navigation tools for the available dimensions.
As a 3/4D analysis package, the most common dimensions a user might encounter are the depth of the stack (Z-axis), and time dimension.
A variety of ways exist to navigate through each dimension. The most obvious and readily available of which are the scroll bars to the right and bottom of the navigator. If a set has more than one Z plane the slider on the right allows the user to go up and down through the stack. If a set has more than one time-point, the slider at the bottom of the navigator allows the user to navigate forward and back through the time points.
Customizeable keyboard shortcuts are also available (Ctrl+F or Ctrl-B for time, Ctrl+U or Ctrl-D for depth).
To navigate through Z quickly without moving your cursor away from the image on to the navigator panel, hold the Shift key and use the scroll function on your mouse or trackpad.
Similarly, to navigate through time without moving the cursor from the image, use the Ctrl key with the scroll function on your mouse or trackpad.
Note that both of these scroll-based functions are only available in the 2D viewer. In the 4D viewer, you must use either the keyboard shortcuts or the Navigator.
Further Topics
Please follow these links to find out more about:
- Switching and syncing viewers